On this page
Recognise the moisture pattern
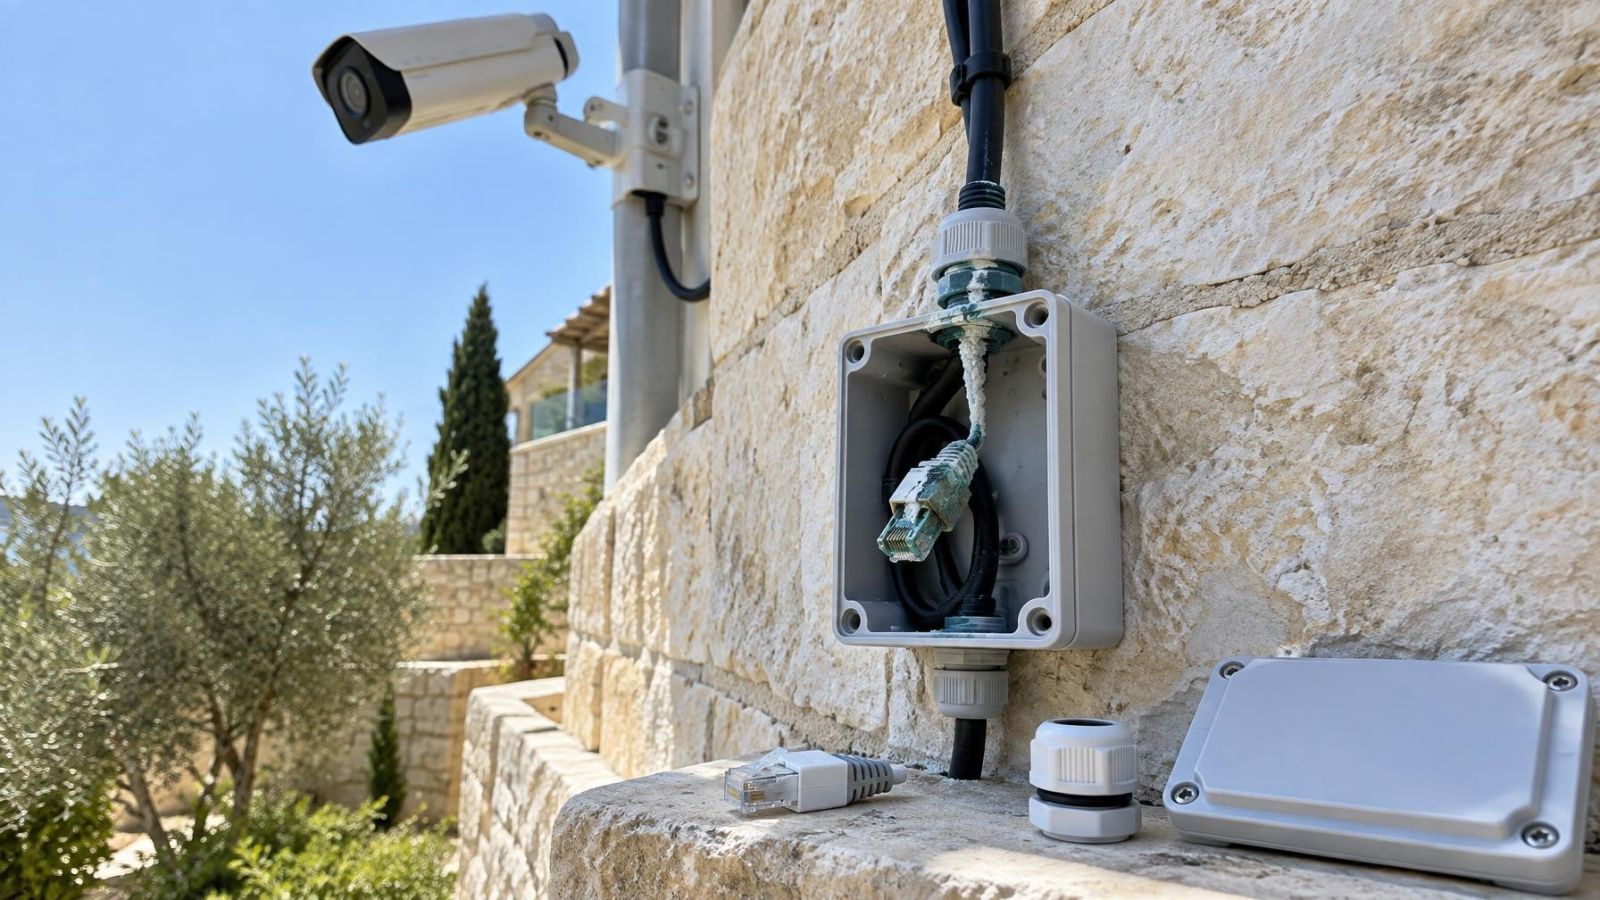
An outdoor security camera at an Israeli home or street-front business begins losing its image whenever rain reaches the wall. Inside the junction box are a damp network connector, a cable gland and a rubber seal; outside, the cable has no useful drip loop. The immediate question is whether water entered through the box, travelled along the cable or formed as condensation. Finding water ingress in outdoor camera connections starts by separating those possibilities before anything is replaced.
Timing is the first clue. An image that becomes intermittent during rain and settles in dry weather points towards moisture affecting the connection. It does not identify the entry point by itself. Water may take time to move along a cable, so the interruption can continue after the visible rain has stopped. Corrosion can also leave a lasting fault that no longer follows the weather closely.
How do you identify water in a camera connector?
Open the enclosure only after power has been disconnected and conditions are dry. Look for droplets, a damp film, discolouration, powdery residue or darkened network contacts. Marks around the connector do not necessarily mean the connector was the entry point. They show where moisture collected. A network plug positioned at the lowest point in the box often receives water that entered elsewhere.
- Direct ingress: moisture commonly leaves a trail from a lid edge, screw point, gland or cable entry.
- Condensation: fine droplets may be spread across several internal surfaces without a single obvious trail.
- Connector damage: residue or corrosion inside the contacts can explain an intermittent image or complete disconnection.
- Camera-body moisture: fogging behind the camera window is a separate fault from dampness confined to the external junction box.
Where is the water entering?
Do not begin with the wettest object. Begin above it. Water follows gravity, cable surfaces and small gaps, so the source is often higher than the visible damage. A cable entering from above can carry water directly towards the enclosure. Even a sound box cannot compensate for an unsuitable cable route.
Inspect the cable gland closely. It seals only when its internal insert matches the cable diameter and compresses evenly around an undamaged jacket. A gland that is loose, distorted or too large can leave a narrow path around the cable. Excessive tightening is not a reliable cure: it can deform the insert, pinch the jacket or pull a mis-seated seal further out of position.
How do you find a camera junction box leak?
Follow marks from the inside towards the outside. Check the lid seam, gasket, screw openings, gland threads and cable entry. A rubber seal should lie flat on a clean surface, without folds, trapped conductors or grains of dust across the sealing line. Then inspect the cable jacket above the box for cuts, flattening, hard bends and sections where water can collect.
The wall-side route matters as much as the enclosure. Water can enter a damaged jacket farther up, move along the cable and emerge inside the box. It can also track along the outside of the jacket beneath loose wrapping or sealant. If the cable disappears into a wall above the camera, inspect the accessible route rather than assuming the gland is the only possible opening.
Isolate the affected connection safely
Disconnect the camera supply before opening the junction box. For a PoE (power over Ethernet) camera, disable or unplug the relevant cable at the network equipment. If the power arrangement is unclear, stop rather than opening a live connection. Moisture around powered contacts can create further damage while the fault is being investigated.
- Wait for dry conditions and make the work area stable and accessible.
- Disconnect power and confirm that the camera is no longer operating.
- Photograph the closed box, cable route, gland orientation and existing drip loop before moving anything.
- Open the enclosure carefully so retained water does not run across previously dry components.
- Photograph the connector, seals and moisture marks before separating them.
- Keep wet plugs, couplers, seals and cable ends apart from components that remain clean and dry.
Photographs are not only a record for an installer. They preserve the direction of the cable and the location of stains before handling removes useful evidence. Remote property owners can also use clear overview and close-up photographs to discuss the fault without relying on descriptions such as “the box looked wet”.
Trace the ingress path
Start with the highest moisture mark inside the enclosure. A wet connector at the bottom tells you where water ended. A stain near an upper screw, lid corner or cable entry tells you more about how it arrived. Dust is useful here: repeated water movement often leaves a clean channel through dusty surfaces or deposits a narrow line of residue at the edge of its path.
Check the lid without assuming that tighter screws mean a better seal. Uneven tightening can twist a small enclosure or compress one side of a gasket more than the other. Look for debris, paint, old sealing material or a cable trapped between the lid and base. Screw points should also be checked for cracks and moisture marks.
At the gland, examine whether compression is even around the cable. The jacket should pass through centrally and should not be split where it meets the gland. Follow the cable upward. If it descends into the enclosure without first dropping below the entry, rainwater has a direct route towards the seal.
What does a wet security camera connection reveal?
A wet connection proves that moisture reached the termination, but it does not prove that the box itself leaked. Compare the highest mark, the cable orientation and the condition of each seal. Where the cable comes down a wall, a proper drip loop should fall below the entry and rise into it. Water then tends to leave the lowest part of the loop instead of continuing towards the box.
Trace water in the direction opposite to gravity: from the damaged connection towards the highest credible entry point.
Could it be condensation?
Yes. Condensation can place moisture inside an enclosure even when no opening is obvious. A box closed with damp air, a wet cable or residual water inside it can retain that moisture. Temperature changes then cause water to collect on cooler internal surfaces. Closing the lid more tightly does not remove the dampness already trapped inside.
Condensation is more plausible when fine droplets appear across broad surfaces and no continuous trail leads from a gland, lid or screw point. Direct ingress more often leaves a local wet area, a run mark or dirt displaced along a repeated route. These are clues rather than absolute tests. A box may have both a small leak and trapped humidity.
Coastal humidity can make drying slower, while strong Israeli sunlight can heat a dark enclosure and increase the temperature change between day and night. Dust adds another useful clue. A clean line through accumulated dust suggests moving water; evenly damp dust or widespread fine droplets fit condensation more closely.
Do not close the box while its walls, seals, cable or connector remain damp. Drying the visible lid while leaving moisture beneath a seal simply encloses the same problem again.
Decide what needs replacement
Clean surface moisture is different from contamination inside electrical contacts. A sound enclosure that has only a few exterior droplets may need drying and correct reassembly. A network connector with residue, discoloured pins or corrosion should be treated as damaged. Cleaning the outside does not establish that the contact surfaces are reliable.
| Condition | Likely action | Reason |
|---|---|---|
| Moisture only on clean, undamaged surfaces | Dry fully and inspect before reuse | The component may remain serviceable if no contamination or deformation is present |
| Corrosion or residue inside network contacts | Replace the affected termination or coupler | Contaminated contacts can cause intermittent images or complete disconnection |
| Cracked, cut or water-filled cable jacket | Replace the affected cable section | Water beneath the jacket can continue reaching a new connector |
| Distorted gland or damaged rubber seal | Fit a correctly matched replacement | Uneven compression leaves a path around the cable |
| Moisture inside the camera body | Assess the camera as a separate fault | Rebuilding the external connection does not remove internal moisture |
Outdoor camera corrosion can extend beyond the visible plug. If moisture has moved under the cable jacket, cutting off only the connector may expose more damp or discoloured conductors. Continue back to clean, dry cable. If that cannot be reached without leaving an unsuitable route or insufficient cable length, replacement of the affected run is the more dependable approach.
Rebuild the connection correctly
A durable rebuild begins with the route, not the connector. Arrange the cable so it enters from below or through a downward-facing opening. Form a drip loop beneath the box, with enough clearance that the lowest part does not rest against the wall or enclosure. The cable should then rise into the gland without a sharp bend.
How should the gland and drip loop be arranged?
Choose a gland that fits the actual cable jacket, not merely the opening in the box. Feed the cable through centrally and tighten the gland until compression is even. The seal should grip the jacket without obvious gaps or severe distortion. A thin cable in an oversized gland will not become well sealed simply because the outer nut is tight.
- Place the cable entry on a downward-facing surface wherever the enclosure design allows.
- Keep the drip loop below the entry so water leaves the cable before reaching the gland.
- Remove dust, grit and old residue from lid gaskets and other sealing surfaces.
- Seat rubber seals flat and keep conductors clear of the lid seam.
- Replace wet or corroded network terminations rather than enclosing them again.
- Confirm that the box, cable end, connector and seals are fully dry before closure.
Avoid packing the junction box so tightly that the network connector presses against the gasket or forces the cable into a sharp bend. Leave the connector supported inside the enclosure rather than hanging from its contacts. Close the lid evenly and check the complete seam. The final arrangement should shed water by shape and orientation before relying on seals.
Verify before returning to service
Restore power only after the connection is closed and the exterior is dry. Confirm that the live image remains stable, then check recording or network status at the NVR (network video recorder) or viewing system where applicable. A stable dry-weather image confirms basic operation, but it does not by itself confirm that the ingress path has been corrected.
A controlled exterior water check can be useful after reassembly. Apply water gently to the wall and cable route above the enclosure, allowing it to follow a natural path. Do not direct a high-pressure jet at seams, glands or the camera. The purpose is to observe ordinary runoff, not to force water through the enclosure.
- Observe whether the live image or network connection remains stable during the exterior check.
- Disconnect power again before opening the junction box for inspection.
- Look for renewed droplets, damp tissue marks or a repeated trail at the gland, lid and screw points.
- Accept the repair only when the interior remains dry and the cable route directs runoff away from the entry.
- Escalate to an installer if moisture returns, the cable is wet internally, the power arrangement is unclear or the camera body contains moisture.
For a remotely managed property, ask for photographs of the rebuilt cable route as well as the closed box. A close-up of fresh sealing material cannot show whether the cable still approaches from above. The useful evidence is the complete path: wall, loop, gland, enclosure and camera.
Key takeaways
- The moisture trail should be identified before equipment is replaced.
- The cable route above a junction box can admit water even when the enclosure appears intact.
- Corrosion inside a network connector is connection damage, not merely surface dampness.
- A downward-facing cable entry and a drip loop direct water away from the enclosure.
- Every component and sealing surface must be dry before the junction box is closed.