On this page
A PoE (power over Ethernet) camera on a flat rooftop may need outdoor-rated Ethernet cable, cable conduit and a weatherproof junction box before the route reaches the indoor network. Each part solves a different problem. Good weatherproof camera cabling comes from planning the entire path against sun, water, dust, heat and physical damage—not from relying on one outdoor component.
Map the Route for Weatherproof Camera Cabling
Start with fixed points. Mark each camera, the network switch, the NVR (network video recorder) and any intermediate network cabinet. Then trace a realistic path between them. A line drawn directly across a plan may pass over an exposed roof, behind fixed furniture, through a shared stairwell or across a garden where the cable cannot be serviced later.
In an Israeli apartment building, the route may leave the apartment, cross a common corridor or roof area, and return through an exterior wall. These shared spaces are normally managed with the va’ad bayit, the building committee. Coordination should happen while the route can still change. Agree on visible conduit, drilling points, equipment locations and who needs access to shared doors or roof areas.
Private homes bring different constraints. Garden walls, gates, irrigation, paving and planting can turn a simple route into several exposure zones. Street-front businesses also need to account for shutters, signs, awnings and routine façade work.
- Prefer the shortest route that is also sheltered, accessible and mechanically safe. The absolute shortest line is not always the best installation.
- Keep connection points where a technician can reach them without removing fixed finishes or disturbing roof surfaces.
- Check both ends of every run. There must be room to terminate, test and support the cable near the camera and near the switch.
- Record concealed sections and entry points on a simple plan. Remote property owners should retain the plan with photographs of the route before it is covered.
Which Cable Belongs Outdoors?
What should you specify for outdoor Ethernet cable cameras?
Use outdoor-rated Ethernet cable wherever the jacket will face sunlight, moisture or repeated temperature changes. The outer jacket is the first defence. Indoor cable may work electrically at installation, yet its jacket can deteriorate when left in strong sunlight or exposed to outdoor moisture. Placing an indoor cable outside does not become a sound long-term choice merely because the connector is sheltered.
For an exposed wall or rooftop cable route, look for a UV-resistant jacket intended for outdoor use. If the cable will touch soil or pass underground, use direct-burial cable designed for that environment. Ordinary outdoor cable and direct-burial cable are not automatically interchangeable: soil contact presents a different moisture and mechanical condition from a cable clipped above ground.
| Route condition | Appropriate cable approach | Important limitation |
|---|---|---|
| Inside a dry, protected building area | Indoor Ethernet cable may be suitable | It should not continue into exposed sunlight or outdoor moisture unless its jacket is rated for that exposure |
| Exterior wall or rooftop | Outdoor-rated Ethernet cable with a UV-resistant jacket | Connections and entry points still need separate water protection |
| Route in direct contact with soil | Direct-burial cable intended for buried outdoor use | The path still needs protection from digging, sharp stones and movement |
| Cable inside outdoor conduit | Outdoor-rated cable selected for the conditions | Conduit can collect moisture and does not convert indoor cable into outdoor cable |
A PoE camera receives network data and power through the same Ethernet cable. Cable selection must therefore support the camera, the switch and the complete run, not just data communication. Excessive length, poor terminations or unsuitable conductor construction can cause a camera to connect intermittently or lose power under load. The category marking alone does not confirm that a cable is suitable for outdoor installation.
Plan Protection From Sun and Heat
How should a roof camera network cable be protected?
An Israeli flat roof combines strong sunlight, hot surfaces, dust and regular disturbance during maintenance. A loose cable placed directly on the roof is exposed not only to heat but also to tools, feet, stored items and work around solar equipment, water tanks or air-conditioning systems.
Use a UV-resistant cable jacket and seek shade where the route permits it. Shade is useful, but it should be treated as an extra layer of protection rather than a substitute for outdoor-rated cable. The shaded side of a wall may still receive reflected light, wind-driven rain and high ambient heat.
Conduit should be securely supported instead of resting loosely on a hot rooftop surface. Supports and fittings must suit the route and should not create sharp pressure points. Long exposed sections also need allowance for thermal movement. A rigidly restrained run can pull against bends, boxes and camera tails as materials expand and contract.
- Avoid using drainage channels as convenient cable routes. They are direct water paths and often collect dirt.
- Do not place cable where roof maintenance requires people to step over it or move it.
- Keep exposed loops small and controlled, while preserving enough service length to reterminate a connector.
- Position boxes and conduit so their weight is supported independently of the camera’s short cable tail.
Keep Water Away From Connections
Outdoor cable is only one part of the water strategy. The most vulnerable locations are usually transitions: a network connector, a camera tail, a conduit end or a wall penetration. Even a protected network connector performs better when it is enclosed and kept away from direct rain, runoff and cleaning water.
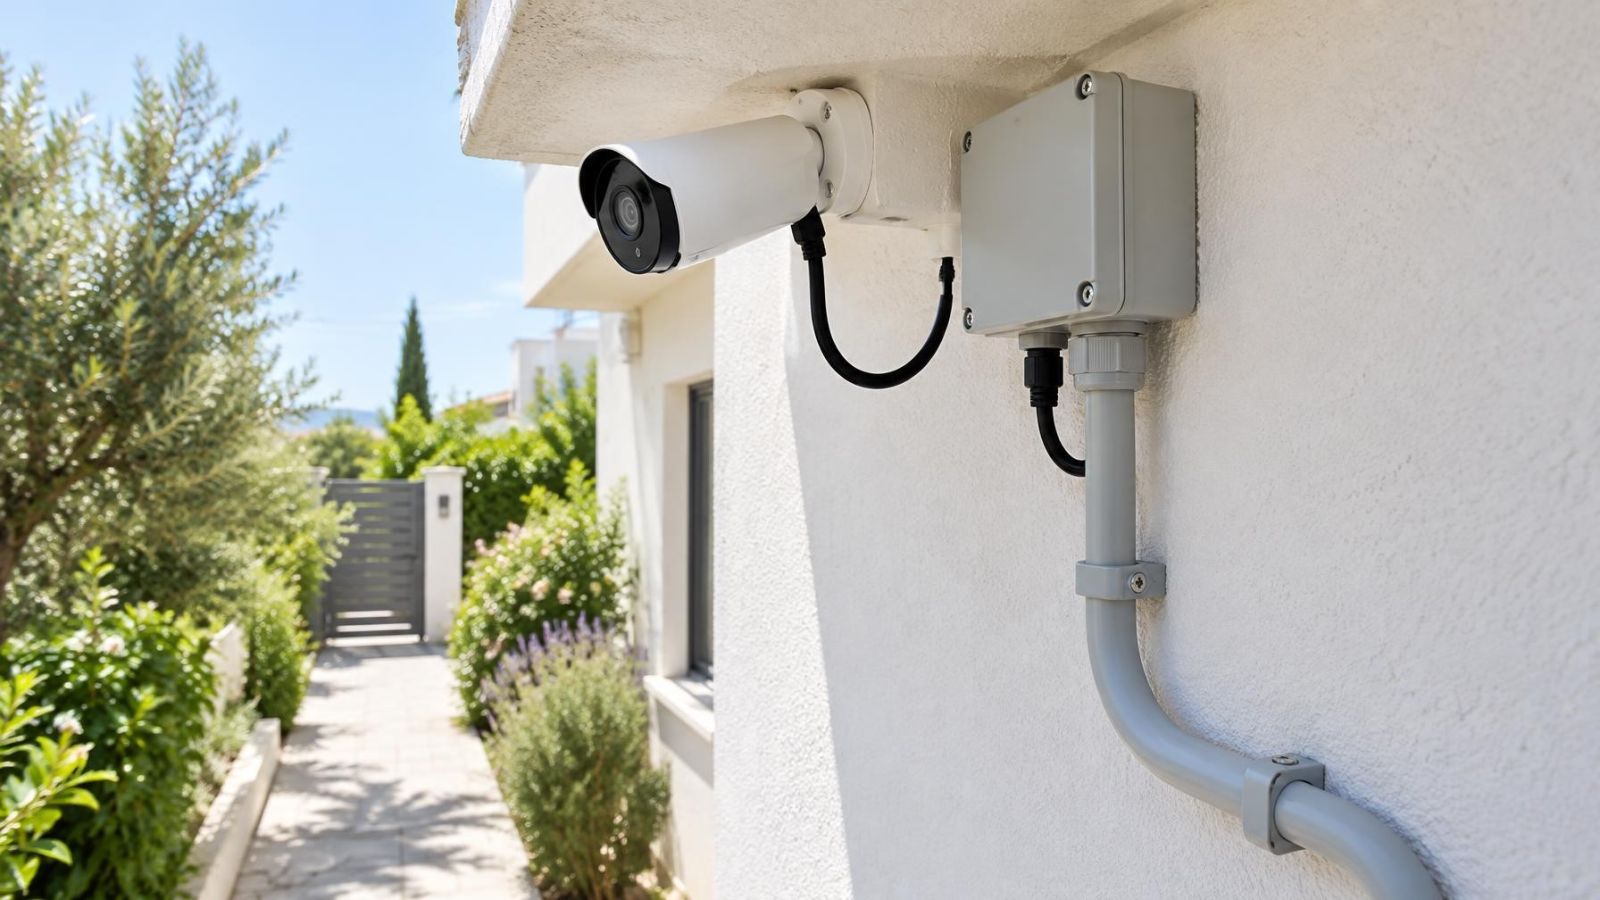
A weatherproof junction box gives the connection a controlled location. It should have suitable cable glands or sealed entries, enough internal space for the connector, and a mounting position that does not place the lid or cable entry in a water stream. Stuffing a connector into an undersized box creates tight bends and makes later inspection difficult.
Before a cable enters a wall or enclosure, form a drip loop. The cable drops below the entry and rises slightly into it. Water travelling along the jacket reaches the bottom of the loop and falls away instead of following the cable directly through the opening.
Sealing every opening without thinking about condensation can create another problem. Outdoor boxes experience temperature changes, and moisture may appear inside even when rain has not entered directly. Use fittings and enclosure arrangements intended for the environment. Where the enclosure design provides drainage or ventilation, keep those features clear and orient the box correctly.
Does Conduit Solve Every Exposure?
Does CCTV cable conduit keep out water and dust?
No. Cable conduit is primarily a route and a layer of mechanical protection. It shields cable from impact and sunlight, but outdoor conduit can still collect water and dust through open ends, imperfect joints or condensation. The cable inside should be selected on the assumption that the conduit may not remain completely dry.
Use fittings and glands suited to the conduit and enclosure. Open conduit ends invite dust, insects and moisture. Improvised gaps around cables also let the cable rub against hard edges. Proper end fittings support the cable and make the entry easier to inspect.
The conduit path must remain pullable. Too many tight bends can make initial installation difficult and future cable replacement impossible. Use accessible pull points where the route changes direction repeatedly or covers a long, complex path. Pull points should be placed where they can be opened without dismantling cameras, fixed signs or building finishes.
Drainage deserves attention before the conduit is fixed. A low section can become a reservoir if water enters from either end. Conduit should not be arranged to direct collected water into a network cabinet, wall opening or junction box. Its slope, termination and connection to enclosures should all be considered as one system.
Conduit protects the cable from the environment; it does not remove the environment from the conduit.
Protect the Route From Damage
Mechanical damage is often ordinary rather than dramatic. A garden spade reaches a shallow cable. A ladder is placed against a wall run. A rooftop cable is moved during maintenance and not returned to its supports. Good routing reduces these predictable interactions.
In gardens, avoid places that are regularly dug, edged or irrigated. Where the route crosses a walking area, do not leave cable or lightweight conduit exposed to foot traffic. At gates and moving structures, make sure the cable does not become a hinge, a tension member or a point that catches on hardware.
Protect cable from sharp masonry edges and metal openings. Maintain smooth bends rather than forcing the cable around a corner. Tight bends can change the cable geometry and place stress on conductors, while unsupported weight pulls on connectors. Near the camera, add strain relief so the connection is not carrying the hanging cable.
Keep network cabling in a separate pathway from power cabling rather than bundling them together for convenience. Plan crossings and shared service areas deliberately. Separation also makes identification and future maintenance clearer, especially in crowded rooftop and business installations.
- Support vertical runs so their full weight does not hang from the upper connector or gland.
- Use smooth, protected transitions where conduit ends and flexible camera leads begin.
- Leave controlled service length inside a suitable enclosure, not as a loose coil exposed on the wall.
- Label both ends using durable identifiers that remain readable without disconnecting the camera.
- Check that doors, shutters, access panels and roof equipment can move without touching the route.
Approve the Route Before Installation
Route approval should happen before drilling, trenching or pulling cable. This is the point when changes are easy. Review the complete path with the installer, property owner and anyone coordinating a shared building area. For a remotely managed property, photographs and a marked plan are more useful than a verbal description.
- Confirm the cable type for every section: indoor, exposed outdoor, conduit and direct soil contact.
- Mark the camera, switch, recorder, junction box and connector enclosure locations.
- Review each wall and roof entry, including the drip loop, gland, sealing approach and internal exit point.
- Check conduit support, bends, pull points, terminations and the direction in which collected water could travel.
- Confirm practical coordination for shared corridors, façades, roofs and locked service areas with the va’ad bayit or relevant site manager.
- Verify that technicians can inspect, test and replace the cable later without opening finished walls unnecessarily.
The final review should also challenge assumptions. A sheltered section may become wet during cleaning. A clear roof path may later be used to service equipment. A garden route may cross planned planting. Moving the cable before installation is simple; compensating for an inaccessible connector or an unpullable conduit after completion is not.
A durable outdoor Ethernet run is therefore not defined by one product label. It is a coordinated assembly of suitable cable, supported conduit, enclosed connectors, managed water paths and accessible service points. When those decisions are made together, the installation is easier to inspect and maintain throughout its working life.
Key takeaways
- Outdoor-rated Ethernet cable should be matched to sunlight, moisture, soil contact and the physical demands of the route.
- Network connectors remain more dependable when they are enclosed, supported and positioned away from direct water paths.
- Drip loops, sealed entries and suitable junction boxes control water more effectively than exposed connectors alone.
- Conduit provides mechanical and sunlight protection, but its layout must also account for trapped water, dust and cable replacement.
- The complete route should be reviewed before drilling begins or cable is pulled through finished areas.